Passive Solar Design Overview – Part 2 in a Series
Posted by nate hagens on January 17, 2009 - 11:28am

Figure 6 - Solar Intensity at Sea Level by Wavelength
In Part 1 of this series, we looked at the three main architectural styles of passive solar design (Direct Gain, Indirect Gain, and Isolated Gain), as well as the first of the five design aspects, Aperture. This article will address the next design aspect, Absorber, at an overview level, beginning with a short introduction in heat transfer basics, so that the reader understands the fundamentals of building heat gain and loss, all of which are as equally important for renovation as they are for new construction.

Heat Transfer Basics
Heat can be transferred from one mass to another by;
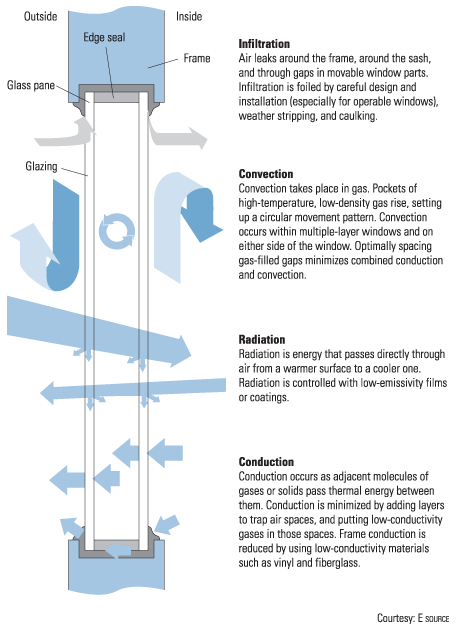
- Conduction: Transfer of heat energy resulting from differences in temperature between contacting adjacent bodies or adjacent parts of a body (i.e., put your hand on a warm stove). Heat travels through walls via conduction.
- Convection: The natural tendency for a gas or liquid to rise when it comes in contact with a warmer surface (i.e., gliders and soaring birds seek rising thermals over sun-drenched land surfaces). For example, interior air will convect upwards from warm thermal mass areas and downwards alongside cool window or wall surfaces.
- Radiation: When one object warms a cooler non-contacting object (i.e., what you feel on your face as you sit in front of a fire or on a sunny beach). Hotter objects will transfer heat to cooler objects within direct line of sight. A person standing near a warm thermal storage mass will feel more comfortable than standing near a poorly insulated wall or window.
Figure 5 shows how these heat transfer types are experienced by windows (and walls, except for transmitted radiation).
Building Heat Losses
We need to have a short primer in thermodynamics (don't worry, this will be relatively simple). First, we have to discuss units of heat. In the English system used by the US, a British Thermal Unit (BTU) is the amount of heat energy needed to raise the temperature of one pound of water by one degree F. In the SI system (rest of the world), joules and kilowatt-hours are the measure of heat energy (1055 j = 1 BTU and 1 kilowatt-hour = 3412 BTUs).
Next, we look at heat energy used over time. If we burn a bunsen burner for one hour (assuming no heat loss), raising the temperature of 1 pound of water 20 degrees, then the heat energy rate is 20 BTU/hour.
In order to determine how much solar heat input and thermal storage we will need, we must understand the heat losses of the building under design;Qloss = (Σ(UA)n + Cv)(ti - to)
where:Qloss = BTU/hr or kW
U = 1/R-value (conduction, see R-values of common materials)
A = area (ft2 or m2)
n = exterior building surfaces (all walls, windows, ceilings, floors)
Cv = infiltration losses (see Architect's Handbook) [1]
ti = desired indoor temperature
to = outdoor temperature, normally the coldest in the 97.5 percentile (2.5% of the time is colder)
Building Heat Gains
Now that we know how much heat is being lost by a building, we can determine how much heat we need to collect. From Part 1, we understood how much energy could be received by our aperture. Let's size our aperture now (with rough calculations) to balance out the losses;
Qgain = (Σ((Qinsolation + Qdiffuse + Qreflected)A)nSHGC + Qother
where:Qgain = BTU/day or kWh/day
Qinsolation = BTU/ft2/day or kWh/m2/day from table in Part 1
Qdiffuse = (normally a part of the empirical insolation data, more at NREL)
Qreflected = insolation energy x surface reflectivity (rough estimate, more at NREL)
n = each window facing the equator (cooling calculations must account for east and west windows)
SHGC = Solar Heat Gain Coefficient
Qother = Heat from people and various powered devices inside the insulated shell [2]
So in order for our building to have sufficient heat input, the daily gains must equal the hourly losses over a 24 hour period, on average, centered around the desired temperature. On cloudy days, the deficit is made up by extra thermal mass (see below), backup heating, or increasing layers of thermal underwear. Note that backup heating could be an active solar heating system with a small collector array and a large storage tank that collects and stores heat on sunny days for use on cloudy days.
An important point to note: the higher the R-value and lower the area of the walls and windows, the less energy is lost through them, hence less sunlight (windows) and thermal mass are needed to achieve and maintain the desired temperature range. That's why superinsulation techniques (e.g., R-50 strawbale walls, minimal thermal-bridging wall components) and space efficiency are commonplace in passive solar design (compared to 6" R-19 walls or 4" R-13 walls, for example). Strawbale walls have far lower embodied energy than concrete, so are highly attractive from an EROEI standpoint. Due to its significant breadth, the subject of energy efficient building techniques will be the subject of another article.
AbsorberThe absorber in a passive solar implementation is the surface that receives the sunlight (direct or reflected), converting the visible light and infrared spectrum energy into heat. Figure 6 shows the light spectrum energy density that penetrates the atmosphere. Note that the most intense radiation comes from the visible light spectrum between 400 and 700 nm, though substantial amounts are also available in the infrared spectrum (if not substantially blocked by low-E glass).
Hence, an appropriate absorber in a passive solar design will convert as much of this impinging spectral energy into heat as possible. The measure of how well the absorber captures the radiant energy is referred to as the absorptivity. The higher the absorptivity, the less energy is reflected away (see Table 1 for properties of common materials).
Once the sun's energy is captured by the absorber, it can also be re-radiated in the infrared spectrum to cooler objects; the measure of this re-radiation is called emissivity. For direct gain homes where a thermal storage floor is heated, emissivity is not much of a concern, as the heat is radiated into the room (if the people or objects in the room are cooler). In situations where the absorbing surface faces external surfaces with little insulating value (i.e., windows), the re-radiation loss is a reduction in energy efficiency and should be minimized as much as possible. Some materials or treatments have much higher absorptivity values than emissivity values; these are called selective, and are also used quite frequently in solar thermal collectors for hot water and active solar heating. Many materials have varying values of absorptivity and emissivity depending on the temperature and spectral wavelength, so the values listed are averaged out for the integral of the solar intensity by spectrum shown in figure 6. See this list for more materials.
Table 1 - Absorptivity and Emissivity of Common Materials[3][4]| Material | Absorptivity | Emissivity |
| White tile/stone/paint | 0.30 - 0.50 | 0.85 - 0.95 |
| Unfinished concrete | 0.65 | 0.87 |
| Red brick/stone/paint | 0.65 - 0.80 | 0.85 - 0.95 |
| Flat black paint | 0.96 | 0.87 |
| Copper Oxide | 0.90 | 0.17 |
| Black nickel | 0.90 | 0.08 |
| Black chrome-coated copper foil |
0.95 | 0.11 |
In Part 3, we'll cover how to select and size thermal mass in order to even out the swings in outside temperature and internal solar gain. Future articles in the series will be devoted to distribution, controls, renovation, design tools, green building standards, case studies, and more.
References:1. David Kent Ballast, Architect's Handbook of Formulas, Tables, and Mathematical Calculations, Prentice Hall, 1988
2. Kissock, J, Internal Heat Gains and Design Heating & Cooling Loads, University of Dayton Lecture
3. Michael J. Crosbie, The Passive Solar Design and Construction Handbook, John Wiley and Sons, 1998
4. John Little, Randall Thomas, Design with Energy: The Conservation and Use of Energy in Buildings, Cambridge University Press, 1984
Contact
- Content: editors at theoildrum dot com
- Tech support: support at theoildrum dot com
License

This work is licensed under a Creative Commons Attribution-Share Alike 3.0 United States License.
Good overview.
Clouds change the wavelength division in that graph 6 above. For example, they block the crap out of the near infrared wavelenghts. Water vapour, after all, is a powerful greenhouse gas. This has important design implications; low solar gain e-coatings will be very useful in designing passive solar buildings in predominantly cloudy areas, like the one I'm in right now.
I'm thinking about replacing my sun facing wall with a water wall (integrating solar gain with thermal storage), but haven't decided on the materials to use. I'm thinking tall black plastic or aluminum tanks behind a single pane glass cover. My wife doesn't have much confidence in my DIY skills, unfortunately :(
You're right about the clouds, though I was trying to keep the article at an overview level. All such comments are welcomed and encouraged.
We'll look at thermal mass next week, and related DIY projects in future articles. Once the basics are understood, DIYers will have a good foundation for assessing, selecting, and scheduling the best spring/summer/fall projects for their individual objectives, respectively.
I'll keep the thermal mass questions for next week then (brine vs water vs Trombe wall).
The builditsolar website referenced earlier has good practical information regarding designs etc.
http://www.builditsolar.com/
Some really cheap projects there that could have massive savings in heating fuel and electricity for low cost when they become standard on new builds.
I've arranged with Greg (the site owner) to feature selected projects of theirs (and from other sources) that can provide good heat energy return on time and material investment for existing homes.
Good job will stewart,this is the information we need.If the odds were as high as one in ten we would be living without electricity 70 years from now,then we should build to last for 500 years,to cool and heat itself with only the sun and never fall below 45 degrees.That would be worth its weight in gold to our grand children.Im looking foreward to the thermal mass part next week.
I have a question about the black nickel paint. What does it cost per square meter, retail? The local store didn't have selective coatings. Do they come in liquid paint or prepainted sheets?
A sampling of selective paints below, methods of application vary;
- http://www.solec.org/SOLKOTEMenu.htm
- http://www.dampney.com/Products/Products.asp?ProductID=28
And some coated surface treatments;
- http://www.solchrome.com/product.htm
- http://www.thermafin.com/coil.shtml
Here's more detailed information (.pdf) on some of the coatings, including performance.
Thanks, looking into that. Perhaps if I go for a low solar gain e coating on the cover, ordinary black paint will be optimal?
That depends (see this reference);
- 1 pane or 2?
- Which surface is the coating on?
- Is it an IR-reflective (best) or IR-absorbing (ok) coating? If the latter, if on surface #3 (inside of interior pane), that's better than surface #2 (inside of exterior pane, which is directly exposed to outside temps). Windows with coatings on surface #3 are often referred to as "Northern low-E" as they are better at retaining heat; windows with coatings on surface #2 are intended to reject heat and are referred to as "Southern low-E". Those south of the equator need to reverse the labels.
And always remember to figure in Solar Heat Gain Coefficient (SHGC) of any window configuration (from Part 1).
The double pane cost more, reflects more, and it never really gets that cold here anyways (freezing is rare). I'm figuring single pane without low e coatings but an absorber with two or three layers of the solar paint is the best combo. Can't get my hands on low iron glass, though, but it doesn't matter much.
For control, I'd want an automatic roll-over triggered by a solar (light sensor) to shut at night and an extra room temperature control for stopping the room to overheat in summer. The large thermal mass of the system (thousands of liters of water at least) could be a problem here with temperature overshoot in the summer.
You may have mentioned this before, but where are you?
I take it this is for residential passive solar? Existing home?
We'll be covering overhangs and other controls in Part 4.
The Netherlands, until I get restless again. Not exactly the best place for passive solar design, but I like a challenge.
Existing residential home passive solar design, south-east facing wall, double bricks with decent rockwool insulation. It's not a structural wall and I have a jackhammer. So be warned, ye wall, I have ways of making you redundant!
The goal you have for your house might be an interesting exercise for a case study.
Will,
there is a big difference in "northern" and "southern" low-E coatings. Technically, the northern coatings are ideally transparent in the near infrared and reflective in the thermal infrared. Southern Low-E is usually only transparent in the visible and reflects near infrared completely. The difference in infrared reflection properties causes the difference in the solar heat gain coefficient.
The insulating glass maker should know the performance data:
Transparency, insulation value (whether R or U-value) and the solar heat gain coefficient.
Almost all of today's low-E coatings are silver-based and need to be protected inside insulating glass.
As far as I know, The only low-E coating that can be used as single glass is Pilkington's K-glass. This low-E coating is based on fluorine-doped tin dioxide (SnO2.) The optical performance and emissivity are not as good as the silver -based coatings but the coating is way more robust.
Gunther
there is a big difference in "northern" and "southern" low-E coatings.
Agreed, as I had stated above.
Black Nickel is not a paint, it's the result of a plating operation, as I recall. Several other low emissivity coatings are also such "high tech" processes, that is, not something the average do-it-yourselfer would be able to produce. There have been some low-e paints, but they don't do as well as the commercial treatments.
E. Swanson
The cost of commercial treatments will have to be weighed against the benefit of the project under consideration. If someone only has access to a small amount of solar insolation, then maximizing that input might make sense in a life cycle cost analysis (i.e., extra $$ vs cost of extra BTUs times number of years of service taking into consideration a discount rate).
from the solar heat group ....
"A selective paint would be expected to offer a high absorbance and a
low emittance, whereas common black paint has both a high absorbance
and emittance.
However, this is not a "zero-sum" sort of problem. The radiation of
light energy varies with the 4th power of the temperature of the
emitter. The surface of the sun is at about 5800 degrees Kelvin and
as such is a pretty good emitter, radiating energy with a peak
wavelength of around 550 nanometers. After a painted pipe absorbs
some of that energy, its temperature might be as high as 350 degree
Kelvin. At this temp its radiation per unit of area is about 1/75,000
of that same area at 5800K. So, not a whole bunch of energy is
radiated. Of that which is, some is reflected by the glazing and a
lot is absorbed by the glazing (the "greenhouse effect"). This is
because the wavelength of peak radiation is a linear function of
temperature, and at 170F the energy emitted by the warm pipe peaks in
the IR, where the glazing is not transparent."
As far as paint goes I understand this is the best of the low cost group ...
http://www.filmtools.com/krulflbl1shb.html
The energy lost (in Watts) to ambient from the collector surface/plate through the glazing(s) would be;
Qtop loss = (Tc-Ta)Ac/(N/{(C/Tc)[(Tc-Ta)/(N+f)]0.33}+1/hc, ∞) + σ(Tc4-Ta4)Ac/(1/[εp,i+0.05N(1+εp,i)]+(2N+f-1)/εg,i-N)
where:
Tc = average collector surface/plate temperature
Ta = ambient temperature
Ac = collector area
hc, ∞ = convection heat transfer coefficient (5.7+3.8V m/sec)
C = 365.9(1-0.00883β+0.00013β2)
εg,i = infrared emittance of the covers
εp,i = infrared emittance of the absorber
N = number of covers (glazings)
σ = Stefan-Boltzmann constant
f = (1-0.04hc, ∞+0.0005hc, ∞2)(1+0.091N)
Franklin Kreith, Jan Kreider, Principles of Solar Engineering, McGraw Hill, 1978, pg 209
Ok, let's revert back to overview mode...
Most people will be more interested in what a formula really implies. In this case, for solar space heating collectors, you'd want to keep the collector operating temperature lower, as that lowers losses. That also tends to have benefits with durability. Requirements for materials are lower with lower temperature differences between the inside and outside temperature.
This requires effective removal of the heat energy from the collector to the room. Thermosyphons are a great way to do this.
I would think these high tech low-e high absorbtivity coatings would be suitable for concentrating thermal systems (for industrial process heat of electricity generation), and not really make economic sense for passive solar heating.
That black nickel is made in vacuum by a process called sputtering. This is way out of reach for home solutions. The properties of this coating are to be black in the visible and near infrared part of the spectrum and non-emitting or transparent for the thermal(long-wave)infrared. In case that stuff is transparent the material below must be of low emissivity. Metallic copper or silver are the most common low emissivity coatings used.
Painting copper black with regular black paint will not solve the problem since it is not transparent for thermal infrared.
I hope this explains why such a coating is not available in retail store.
Gunther
That black nickel is made in vacuum by a process called sputtering. This is way out of reach for home solutions.
A reference mentioned above has other less difficult ways for producing coatings of black nickel-oxide and zinc oxide, basically carbon nanoparticles embedded in oxide matrices of zinc or nickel on aluminium substrates. If a DIYer considered such an approach, they would also need to take into consideration the bonding between the substrate and the thermal mass, if the project called for heating of a thermal mass directly from the absorber.
Painting copper black with regular black paint will not solve the problem since it is not transparent for thermal infrared.
I would hesitate to make such a blanket statement. As mentioned previously as well, one needs to run the numbers in order to determine if flat black will suffice or if it is worth the time and money to use a selective surface treatment.
For available selective coating spray paints, see the ones mentioned further up in this thread.
Interesting article, table 1 was a surprise... I would have thought black-is-black, and had no idea there is so much difference in the efficiency of different coatings.
Did you also look at the information in the table with more detail linked just above Table 1?
A valuable (in practice) resource I find is ....the Solarheat group
http://tech.groups.yahoo.com/group/SolarHeat/
I have invited them to comment
20' Wide Passive Solar Cabin in progress ...
http://flickr.com/photos/10162336@N06/3203613207/sizes/l/
http://flickr.com/photos/10162336@N06/
Absorber ... Black Polyester Felt or ??
What are the properties of the aperture (SHGC, low-E, R-value, etc)? Is this in SoCal?
Are you adding a vent damper to shut off the backward collector convection (reverse thermosiphon) after sundown? (probably there, just can't tell due to size of image)
Aperature ... 4' tall x 40' long (bottom half of south wall) properties not totally known
glazing not yet chosen ... first choice - double wall polycarbonate (4x8' sheets).... but depending on outcome of this series
Project in N. California Temp. chart .... http://flickr.com/photos/10162336@N06/3204587378/
Polycarbonate properties will vary, though I've seen some dual wall with SHGC of 0.81, R-value of 1.67, and no low-E.
What temperature are you designing your absorber to operate at (i.e., vent opening sizes, outdoor/storage temperature differentials, time of day, etc)?
An update that didn't make it into today's article;
Cv= infiltration losses (0.018 times the building volume times Air Changes per Hour(ACH) (see here (.pdf) or Architect's Handbook) [1]
There is a fourth building style that you have overlooked. It is a style that is very Roman in origin. This style presents to the world a blank wall (hanging garden) and faces inwards to a central court yard (garden) in a version which can be seen in Italy in various places. But the version developed by California's Malcolm B Wells (and myself) has a building that is partially submerged to be over filled with about 700 mm of soil where, again, the central open court yard becomes the opening to the world and all natuaral ventialtion and light. The visible above ground elements are ventilation, skylights, entrance and carparking. Such a construction can be built on very small sections down to 400 sq metres while still leaving 60% of the land available for garden and recreation.
Advantages:
Year round stable air temperature
Increased lighting
Cyclone and tornado proof
Wild fire proof
Minimal exposure to falling trees
Improved security
Reduced maintenance
Disadvantages:
Increased flood risk
Loss of Architectual visual presence
Marginal increase in cost (possibly)
Reduced support structure for solar energy systems
It is going to become increasingly important to not look to the past to find a building style, but to look to where our future climate is taking us. We are now on the edge of the future serviceable life of our present building styles. That is, buildings of present design are likely to be serviceable for only 40 years before their design parameters are obsoleted by high wind, fire storms, ambient air temperature (increasing combustibility) and location. I personally doubt that the present day Architects Handbook will be very relevent to many building locations 50 years from now.
BBB;
I've regularly visited the idea of reapplying the Italian Villa or Mexican Hacienda layout, particularly with a sheltered cove/garden and a semisubmerged aspect to it. Do you have some links to projects or further examples of this approach? My versions often have the courtyard being partially set up as greenhouse space, or possibly the center being a seasonal enclosure, so the gardens have winter protection.
Many thanks,
Bob Fiske
Bob,
I was designing this way as a mental exercise when I was at High School. My dad was an architect who preferred Frank Lloyd Wright's work and designed appropriately for the schools, hospitals, banks and public buildings that he was employed to design for the Australian government. This would have been intellectual death for me. I, like Malcolm Wells, hated the obliteration of environment for the purpose of human existence. My version of the construction was a little bit more industrial and geometric than Well's, though. My proposal was to grade a whole row of sites, project style, and build the buildings as above ground in one complete set to reduce the costs and to allow efficient trenching for services, waterproof with a mixture of water miscible epoxy grout, plastic membrane and bentonite, then back fill and landscape. There are a broad range of methods to improve lighting and ventillation keeping in mind that light exposure may be a variable requirement over time. The image at the "here" below really appeals to me because I like very filtered light but the images at
http://www.amazon.com/gp/reader/1890132195/ref=sib_dp_pt#reader-link
will give some idea of the variety available. Click on the arrows at the edge of the photo to preview malcolms style. Another publication of his is at :
http://www.eric.ed.gov/ERICWebPortal/Home.portal;jsessionid=HJ2QryWkjpv2nwP98fHmbVhqNnh9FnL1qpnkQDzhDx5pJ2J4kFjW!669208150?_nfpb=true&_pageLabel=ERICSearchResult&_urlType=action&newSearch=true&ERICExtSearch_SearchType_0=au&ERICExtSearch_SearchValue_0=%22Wells+Malcolm+B.%22
Sorry that I have never built a house along these lines, Bob, my interests turned to ferro cement boats instead. One of which I did build in the 70's, and am just starting to build a second for my daughters. Very similar effect but relocateable. The first was a 45 foot Samson design, the current one is a 27 foot Benford (cat boat) design that I have loved for many years.
On the housing front I am now very vocally proposing that houses of the future should have a below ground level component as an extreme weather contingency. The only other consideration is how far above current sea level should one build? It will be another ten years before we have a clear indication of that.
For anyone contemplating semisubmerged construction it would be helpful to read up on the properties of cement from a boat builder's point of view. With the appropriate reinforcement and the correct water to cement ratio along with pozolanic ash, very thin sections of cement construction are completely impervious to water. I had to break up a garage floor slab once that was at least 60 years old. This cement was almost indestructible and green inside. It still had the original water in it from its forming. Properly done these below ground constructions will not leak, ever.
Very Helpful. Thanks!
Thanks for the boat builders angle on cement. Are these sort of mixes a problem if the concrete must be several inches thick, as would be needed for a 2 1/2 to 3 story half buried building?
The correct water cement ratio is very stiff. When plastering a hull the plaster is hand worked to get it into the dense mesh reinforcement. Vibrators are used to work the cement into areas that cannot be hand worked. Too much vibrating causes the cement to float out so vibration should be kept to a minimum. In a building situation where the reinforcement is far less dense there should be even less vibration required. It is important to include several layers of chicken or fine square mesh included in the reinforcement layup as this serves to restrict the formation of cracks in the cement. The pozzolin disolves into water that is seeping through cracks an crystalizes at the boundary of the surface and then back into the crack where one forms. This is the white material that can be seen on cracks in very old cement tanks. It would pay to learn about the properties of bentonite. 20mm of this very fine clay is imperveous to water and is used to line dams in NZ. If properly laid before the below ground section of your structure is laid out this will give added security against water incursion.
In Katoomba in the Aust Blue Mountains there are many shelters built from the ferro cement process that were formed to look line natural rocks. All of these structures are older than I am and look today as they did when I first saw them in the fifties. The only deterioration is from vandalism. I think that they look fantastic and are very practical. Had the council gone a little further and covered them with plants in various ways then they would have been totally stunning. If I knew how to put photos up here then I would arrange for some shots in a future thread on buildings.
In recent years water reducing agents known as superplasticizers have been developed. They greatly increase the slump of concrete for about the first two hours, after which the slump reverts to whatever is typical for the water to cement ratio.
4000 to 5000 PSI concrete made with a low water to cement ratio is waterproof, if cured properly. It would have a one inch slump without superplasticizer and would not be workable. With superplasticizer it flows somewhat like honey with rocks in it, and is somewhat self leveling.
Thanks for your input. In Part 3 of this series, there are several more styles that are examined, as thermal mass variations in location, size, and type result in a large number of design possibilities. The building you seem to be describing (without having a picture to go by; do you mean something like this?) appears to have south, east, north, and west facing windows. In the most basic treatment, it can follow the first model (Mi>direct gain unless you are using trombe walls or indirect gain) and use the R-values of the earth/building coupling in the heat transfer equation.
I had considered such a design myself in the early-mid '80s (after having seen it in a magazine), though was also concerned about the water table at the site and probable summer humidity issues with cool below-ground walls (Virginia), passive ways to heat the rooms with windows on the north side, and how to best control summer insolation in the rooms with east and west windows (without having to put up and take down awnings).
Cyclones and tornadoes wouldn't knock down such a structure (if sufficiently braced), though window damage could be considerable, as well as the interiors of the rooms with windows.
Have you built many of these? The costs I've seen in the partially underground houses I've studied were much higher than typical construction methods (often 2-3 times as much). Any links to case studies (or otherwise)? Pricing per sq ft?
The northern rooms in such a house could be devoted to storage.
One could also envisage an amphitheater-like design, where the southern side of the patio is an open half round staircase receiving the sun. The northern side, if half-round, would receive some morning and evening sun, making eastern and western rooms unsuitable for storage. But then you could use the space underneath the amphitheatre for storage.
And think of all the fun you could have, watching shows on your own patio.
Any current pictures ?
Will;
Just wondering, and so I understand correctly, if you have an absorber like flat black paint with its high absorbtivity, even though it is reradiating that energy in the lower wavelengths as IR or below (?).. that a glass aperture facing it will be reabsorbing that radiated heat, even while the glass is opaque to IR energy. I had once been under the impression that the IR would basically reflect off the glass, not absorb.
Sorry if you've already explained this.. or if it's in an upcoming post.
Thanks,
Bob
First time contributor - My wife and I built a passive solar, strawbale house here in Central NY a couple of years ago. It is warm and toasty these last few days (low of -8 last night). Our backup heat comes from a wood cookstove that is centrally located. It also is heating water that can be directed at radiant floor heat or domestic hot water. The house uses about two cords of wood each winter. On a sunny cold day we typically only have a short fire in the evening. To me the secret to a owner-built passive solar home is to make it small, (ours is about 1000 sf.)make as few windows and doors as needed that go directly from the inside to the outside, (we have no doors and four windows that do). Most of our light, and view, and heat comes from a green house attached to the south side of our house. The glass for the greenhouse is primarily sliding glass door blanks. Cost effective, and good performance. Our house cost about 75K to build a couple years ago, but that includes a full basement that was designed for a root cellar and two cheese caves. You can see pictures of our house on my web album: www.picasaweb.google.com/mulemandonn
I'd like to hear more; please email me at skyemoor@hotmail.com
A key post on your experience would be great. There's a lot of talk here about sustainable this and that, renewable this and that, but when I have posted links of people building straw bale, living off-grid, etc., they get zero response.
Conversely, something like Todd's post, which while impressive in it's way, is not so much the direction we need to go (multiple caveat's to Todd and his post; no criticism or even critique intended) yet gets tons of responses.
*sigh*
E-mail, my arse! Keep posting!! Goodness, Will... don't like to share?
;)
Cheers
A key post on your experience would be great.
This is what I had in mind, so I wanted to coordinate. There are others as well who have valuable experiences to share and I'd like to hear from them as well.
Hmmm... you'd think I'd have gathered that. Gettin' senile already? Egads.
I'll shut up now.
Cheers
Bob,
Great question. What happens to IR when it strikes a window? If it is low-E treated, it will reflect (actually "not transmit or absorb") a substantial portion back into the room or back onto the flat black surface [1]. Plain glass, on the other hand, absorbs a large portion of the long-wave infrared that people and objects tend to radiate (though allowing much of the short-wave to pass), and a single pane glazing would lose much of this absorbed energy to the cold outside air via convection.[2]
Black chrome coated copper foil. Not really DIY for non-wealthy folks.
I'm wondering about painting aluminium foil black and then glueing that onto copper foil. Which I probably could manage.
I'm wondering about "shutters" all around house / garden that can be configured for either winter/summer.
Thanks.
I'm wondering about painting aluminium foil black and then glueing that onto copper foil.
What kind of collection are you attempting (absorber for hot water collector, hot air collector, or thermal mass)?
Shutters to be covered in Part 4.
Non engineer, very much in "rumination phase" but, in winter want to get sunlight/heat in to most equatorial wall (thermal mass), also get heat into "closed water tube" and pump that through internal walls. Small improvement only required for winter comfort. Intend to put up greenhouse against equatorial wall, hothouse in winter, isolated gain from open full height window on 20% of wall. Get more from getting heat into the other 80% of wall.
In summer very different, want to keep all solar radiation from entering basically so I'm looking at reflection, using climbing plants between wall and heat source. Refllect mush light and heat away drom equatorial wall and shadehouse (greenhouse reconfigured - pop in panels for each season?)
Mulberry tree, now 12 years old, has successfully stopped summer late afternoon heat on sunset facing wall.
Thanks Will
What do you intend your absorber surface to be (wall, floor, other)?
Side note: I made mulberry preserves yet again this year. I'm all in favor of landscapes that produce food.
Sorry,
with commercial paint you do not need aluminium foil in between. Copper has a very low emissivity, so no need for aluminium and usual paint is not transparent in the thermal infrared. A black collector behind a "northern" low-E with high solar heat gain would bring thermal insulation too. If the low-E is not protected inside insulating glass, ask for pilkingtons K-glass. This low-E could be used as single pane.
Gunther
Check out your local video store, or contact ROSCO directly. www.rosco.com
Other mfg's as well.
They make a product called "BLACKWRAP" or "CINEFOIL" that is a flat black, coated heavy alum foil.
Small is beautiful. Remember to Power Down.
Absorptivity & Emissivity table 1 plus others.
http://www.solarmirror.com/fom/fom-serve/cache/43.html
SOLKOTE HI/SORB-II seems to be the top coating
used by this company ...http://www.cansolair.com/
Panel ... http://www.youtube.com/watch?v=bRZvAAqzXIw
Absorptivity & Emissivity table 1 plus others.
Yes, a good list, this is a mirror of the one I linked in the article above (link just above table 1).
Passive solar heating is of abstract interest only for me. Heating is not a major issue in New Orleans (a fair # of hours at 38 to 45 F, not too many below that, very rarely below freezing, 54 F ATM while it is 20 F in Baltimore). Cooling and humidity control are.
Are there any glass panes that can fit into old wooden frames (low-E single or double pane) ? A source or brand name ? To keep solar heat out, not in.
Thanks,
Alan
Alan, you would not need a low-E coating but a reflective or sun-protection coating. If you want to use a single pane you will need a "hard" coated glass. The term "hard" refers to use as single pane. Another possibility is to put a reflective film on the pane. If you need to replace the glass anyway, use a hard coating or insulated glass.
Ask a local glass maker or dealer for glass with low solar heat gain. A local dealer should have appropriate stuff.
Sorry that I can not be more specific, but I am an ocean away.
Gunther
The larger panes (roughly 40 cm x 15 cm) have reflective film on the interior side. 8 windows, 10 panes each, each pane roughly 15 cm x 7 cm, (forgot exact measurements and a half continent away) is not a chore that appeals.
Plus the edges of reflective film tend to turn on the edges slightly. Small panes are not ideal for reflective film.
I googled Pinkington and will call and find out in any local glaziers stock their Low E product (good brochure explained the Northern and Southern types of Low E).
Best Hopes,
Alan
Looking at this it would seem that increasing the insulation in walls would make a significant difference to the performance of the house. 3" extra insulation would seem to double the performance?
Gary,
Indeed, a modestly insulated house can see large increases in performance by adding 3 inches of insulation. For example, an R-11 wall would seemingly become R-23. However, if using typical stud framing, the studs in the walls act as thermal bridges to partially bypass the insulation (though some wall systems have a way around this, more in future articles). Application of an external spray-on insulation does not have that issue. Windows don't change with more insulation, and in some homes, are where the greatest heat loss is, so there is a point of diminishing returns with more wall insulation. Also, infiltration is another loss that often doesn't change much with more insulation. However, when someone is adding insulation, it's normal to look for and seal up infiltration leaks.
True, thermal bridges are an issue. However if you are specifically putting it on to increase efficiency you are likely to deal with that one.
As far as windows are concerned, it would seem simple to add automatic window shutters for the night. Not only is this the time with the greatest delta T (contrast heat flow on 10C day with 0C night) and longest duration when its cold, - 2 inches of insulation in the shutter would make a world of difference to window heat flow.
Not sure of your typical figures for infiltration losses, but for average houses which are tolerably air tight I would expect losses to be much lower than other loss factors, probably even dominated by people opening small windows to get fresh air.
Great series Will - very much appreciate it. You said:
I hope I'm not jumping the gun, but I'd like to see you comment on the use of DIY tilt up concrete as both the thermal mass and structural backbone of a building. Wife and I built the house and workshop with only our own labor and a couple of young guys in the neighborhood. Of course the local concrete plant, rebar supplier, and crane company did their part. It seems to us that this was a relatively simple and inexpensive construction technique - we did this in our spare time while we were both working full time (but used all of our vacation time). The concrete structures shown have 6" concrete exterior walls covered with insulation and 1" of stucco on the outside. One building has 12" of fiberglass (total 19")and the other has 2" of foam plus 6" of fiberglass- total 15" (I think foam is the best).
The MeadowBurke Co provides a complete set of products and detailed "how-to" manuals (free on-line). Actually, we fabricated many of the gadgets they sell. The Hugh Brooks Design and Construction Manual is also very good but expensive. All of the design details for the panels must strictly adhere to American Concrete Institute and Concrete Steel Reinforcing Institute specifications. And concrete mix must adhere to Portland Cement Assoc specs for architectural grade concrete (free manual). A few nights at the library will be needed (some books are expensive)to confirm your design. However, for the size and loads of the panels we needed, the design was less complicated than most of my wife's cooking recepies. I just looked up the page that had my dimensions and copied the rebar layout. Once the specs are determined for the steel reinforcing, you should be able to have all the pieces cut, bent, and delivered by truck to your site. As for the concrete itself we insisted upon no more than a 3" slump.
I posted a photo of our house before, but here is a little more detail on its construction. Sorry for the quality of the photos - I had to scan some nearly 30 year old prints.
All wall and ceiling panels were cast on the ground (thin pad on the bottom):
The crane comes and lifts panels into place:
Panels are set into a bed of mortar and then bolted or welded in place.
The concrete structure looks like this:
And these are the finished buildings:
Previously, I posted some of the pros and cons of our particular buildings (and got some good advice for conserving solar gain). However, now I'm hoping you might comment on the more general concept of using tilt-up concrete - cast on site by DIY folks. As I did this almost 30 years ago according to the published advice at that time, I'm wondering if now this approach is considered to have some inherent shortcomings. This technique worked well for us - but, don't know of anyone else who has taken this approach. As I posted before, it is a really nice house to live in.
I hope I'm not jumping the gun
No one's thrown a flag, so you must not be offsides yet...:-)
This may sound odd, but is the insulation on the inside or outside? With so much internal mass, it doesn't matter as much but just nice to know.
We'll get more into the thermal mass concepts next article.
Btw, my basement is a Superior Wall foundation, somewhat related concept that has worked well for me.
Concrete on the inside - inside walls and ceilings finished with skim coat of textured plaster to improve sound quality without affecting heat absorbing. Floors are ceramic tile. Exterior - out door side of concrete:
plastic vapor barrior
2" Dow Styrofoam or 6" fiberglass batt (one building has the foam, one does not)
Another 6" fiberglass batt
1/2" oriented strand board
3/4" old fashioned cement based stucco and cedar boards
The whole idea is to have the thermal mass on the inside to create a thermal flywheel with the insulation on the outside to retain the heat (or coolth in summer) - and this works extremely well. Our heat is very even and free of drafts - everyone comments on how nice it feels in our house even though we have the thermostat set lower than most of our neighbors.
Your Superior Wall is a nice product but I would quibble with the theory a bit. Our foundation walls - just a 4' crawl space - are 6" of concrete with 4" of Dow Styrofoam on the outside. But then, our crawl space is actually a heat plenum for our boiler system. Superior Wall has the concrete on the outside - so, no contribution to thermal mass.
Saving energy in times of common unemployment...DIY project
I recommend replace radiator heaters with wall heating as follows: in the course of refurbishing my old european farm house I installed wall heating, a standard flexible compound tube embedded in 8 cm thick loam plaster. The plaster is stabilized with a paint of marble flour, ammonium tetraborate, and curd, and after drying, several öayers of linseed oil. The effect is as such that the subjectively felt temperature is about 6°C higher than the objective. I had about 100 test individuals so far. The saving of (Russian) gas is in the range of 50%. The effect in said magnitude appears only with loam. It is very labor intensive but as unemployment will exceed 20% soon...
A famous environmentally tilted architect has just completed a private school building that has loam as the only material ( plus glass, of course) it is a zero energy house. It seems that loam has some yet unreserached psychological properties in terms of subjective impression of temperature.
Maybe cast earth (loam) infill into a steel frame with strawbale insulation
http://flickr.com/photos/10162336@N06/3208111543/sizes/l/
No loam does not "like" metals except oxydized copper it has to be a wood framework.
I used a particular product for thermal insulation which is basically recycled paper it features the same thermal conductivity as styrofoam. Kind of expensive, however.
Btw the treatment with linseed oil yields a waterproof surface with a silk- like texture. So far no sign
of leakage in the shower.
I am more interested in a scientific explanation of the subjective impression of temperature but did not find any so far.
My wife and I designed and built our passive solar, earth sheltered home in the mid `80`s, and have been comfortably living in it since. We poured a slab, slipformed local stone and concrete walls, insulated the exterior, both above and below ground. I gladly answer any questions. Check us out at-
Solar home tour-
http://www.youtube.com/watch?v=utqdKcRxkK0
http://www.builditsolar.com/Projects/SolarHomes/Doug/DougsSolarHome.htm
Both sites have several pages of mine. Doug in TN
Excellent. Thank you for showing what can be done. Now, if we can get a paradigm going, then people like you can act as teachers/mentors/foremen for others to do the same.
Build out: The Grid vs. The Household - Towards a Community-based Solution to CC and PO
Cheers
From the comments, it seems that this is a new concept for the building industry. Or it is at best a cottage industry. Everybody seems to be a do-it-yourselfer, experimenting on their own homes.
It is interesting and valuable to concentrate the techniques in a blog like this. But do you see any ways this can be addressed on a larger scale, perhaps with building codes and/or urban planning/zoning? Of course, a large part of the problem is road blocks from the energy industry and utilities -- loud, well-financed special interests that earn their money from selling the public BTU's. I wouldn't be surprised to find out they block attempts to approve building codes that demand more insulation, for example.
That depends on regulation. Germany has possibly the tightest frame of regulation considering thermal insulation ( 3 brick walls and 3 pane windows ) of private homes and also concerning efficiency of heating equipment ( no more than 11% loss total must be checkd once a year ) . Of course this has created and secured jobs in construction.
However becoming aware of the risks of supply as in the recent Russian gas row people are now convinced the high initial cost pays off and eventually the total bill gets positive. Passive homes and solar panels either photovoltaic or thermal are common even in remote villages because of subsidies.
A new subsidy program set up by government covers heat pumps. Most efficient are heat pumps which extract thermal energy from ground water
you get 6 kilowatts thermal output for 1 kilowatt electrical input.
The seasonal variation of ground water temperature is low. This is an almost inexhaustible source. As evry heat pump the operation can be reversed i.e. for cooling.
Apparently heat pumps are hardly ever discussed in US.
I built a aerated concrete(AAC) house and the local building inspectors checked for the conventional code issues. The AAC is an ASTM tested material and Energy Star certified, so I presented the technical info along with the plans for approval, which they approved with no questions.
The only problems I had were due my lack of knowledge of some of the codes (in spite of doing a lot of reading and asking questions to the building dept.) This resulted in some re-work, which was not a major cost.